Systemd 是 Linux 系统工具,用来启动守护进程,已成为大多数发行版的标准配置。

守护进程
守护进程(daemon)是指在UNIX或其他多任务操作系统中在后台执行的电脑程序,并不会接受电脑用户的直接操控。此类程序会被以进程的形式初始化。守护进程程序的名称通常以字母“d”结尾:例如,syslogd就是指管理系统日志的守护进程。用户退出session之后,“后台任务是否会继续执行”是判定这一任务是否为“守护进程”的依据。
Systemd概述
Systemd出现前,Linux的服务已知采用init进程启动,例如运行下面的命令可以启动apache服务:
1
2
3
| sudo /etc/init.d/apache2 start
service apache2 start
|
优于init是串行启动,只有前一个进程启动结束才能继续,因此这种方法启动时间比较长,并且init进程只执行启动脚本,不管其他事情,因此启动脚本会非常复杂。
Systemd 就是为了解决这些问题而诞生的。它的设计目标是,为系统的启动和管理提供一套完整的解决方案。
根据 Linux 惯例,字母d是守护进程(daemon)的缩写。 Systemd 这个名字的含义,就是它要守护整个系统。
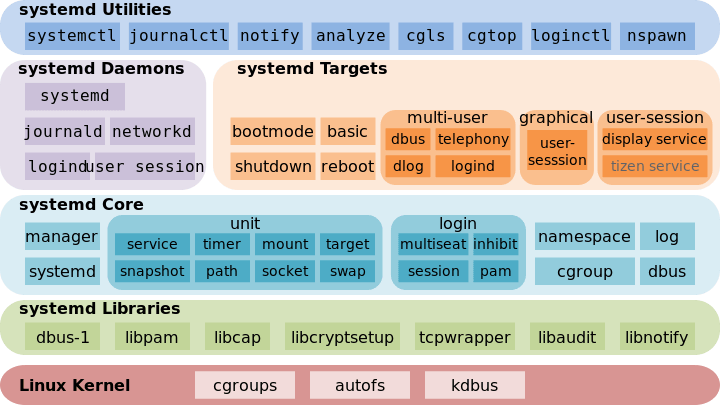
Systemd 的优点是功能强大,使用方便,缺点是体系庞大,非常复杂。下图是Systemd体系架构图:
系统管理
Systemd不是一个命令,而是一组涉及到系统方方面面的一组命令。
systemctl
Systemd 的主命令,用于管理系统
1
2
3
4
5
6
7
8
9
10
11
12
13
14
15
16
17
18
19
20
|
$ sudo systemctl reboot
$ sudo systemctl poweroff
$ sudo systemctl halt
$ sudo systemctl suspend
$ sudo systemctl hibernate
$ sudo systemctl hybrid-sleep
$ sudo systemctl rescue
|
systemd-analyze
用于查看启动耗时
1
2
3
4
5
6
7
8
9
10
11
|
$ systemd-analyze
$ systemd-analyze blame
$ systemd-analyze critical-chain
$ systemd-analyze critical-chain atd.service
|
hostnamectl
查看主机信息
1
2
3
4
5
6
7
8
9
10
11
12
| $ hostnamectl
Static hostname: ubuntu
Icon name: computer-vm
Chassis: vm
Machine ID:
Boot ID:
Virtualization: vmware
Operating System: Ubuntu 18.04.6 LTS
Kernel: Linux 5.4.0-150-generic
Architecture: x86-64
$ sudo hostnamectl set-hostname test
|
localectl
显示本地化信息:
1
2
3
4
5
6
7
8
| $ localectl
System Locale: LANG=en_US.UTF-8
VC Keymap: n/a
X11 Layout: us
X11 Model: SKIP
$ sudo localectl set-locale LANG=en_GB.utf8
$ sudo localectl set-keymap en_GB
|
timedatectl
显示当前时区设置:
1
2
3
4
5
6
7
8
9
10
11
12
13
14
15
| $ timedatectl
Local time: Fri 2023-11-17 03:42:56 PST
Universal time: Fri 2023-11-17 11:42:56 UTC
RTC time: Fri 2023-11-17 11:42:56
Time zone: America/Los_Angeles (PST, -0800)
System clock synchronized: yes
systemd-timesyncd.service active: yes
RTC in local TZ: no
$ timedatectl list-timezones
$ sudo timedatectl set-timezone Asia/Shanghai
$ sudo timedatectl set-time YYYY-MM-DD
$ sudo timedatectl set-time HH:MM:SS
|
loginctl
查看当前登录的用户。
1
2
3
4
5
6
7
8
9
10
11
12
| $ loginctl
SESSION UID USER SEAT TTY
c1 121 gdm seat0 tty1
2 1000 user seat0 tty2
$ loginctl list-sessions
$ loginctl list-users
$ loginctl show-user user
|
Unit
Systemd 可以管理所有系统资源。不同的资源统称为 Unit(单位)。
Unit 一共分成12种:
- Service unit:系统服务
- Target unit:多个 Unit 构成的一个组
- Device Unit:硬件设备
- Mount Unit:文件系统的挂载点
- Automount Unit:自动挂载点
- Path Unit:文件或路径
- Scope Unit:不是由 Systemd 启动的外部进程
- Slice Unit:进程组
- Snapshot Unit:Systemd 快照,可以切回某个快照
- Socket Unit:进程间通信的 socket
- Swap Unit:swap 文件
- Timer Unit:定时器
查看unit:
1
2
3
4
5
6
7
8
9
10
11
12
13
14
|
$ systemctl list-units
$ systemctl list-units --all
$ systemctl list-units --all --state=inactive
$ systemctl list-units --failed
$ systemctl list-units --type=service
|
Unit状态
systemctl status命令用于查看系统状态和单个 Unit 的状态:
1
2
3
4
5
6
7
8
|
$ systemctl status
$ sysystemctl status dbus.service
$ systemctl -H root@remotehost status httpd.service
|
Unit管理
我们常用的用于启动和停止 Unit命令如下:
1
2
3
4
5
6
7
8
9
10
11
12
13
14
15
16
17
18
19
20
21
22
23
24
25
26
|
$ sudo systemctl start apache.service
$ sudo systemctl stop apache.service
$ sudo systemctl restart apache.service
$ sudo systemctl kill apache.service
$ sudo systemctl reload apache.service
$ sudo systemctl daemon-reload
$ systemctl show apache.service
$ systemctl show -p CPUShares apache.service
$ sudo systemctl set-property apache.service CPUShares=500
|
依赖关系
Unit 之间存在依赖关系:A 依赖于 B,就意味着 Systemd 在启动 A 的时候,同时会去启动 B。
systemctl list-dependencies命令列出一个 Unit 的所有依赖,上面命令的输出结果之中,有些依赖是 Target 类型(详见下文),默认不会展开显示。如果要展开 Target,就需要使用--all参数。
1
2
3
| $ systemctl list-dependencies nginx.service
$ systemctl list-dependencies --all nginx.service
|
配置文件
每一个 Unit 都有一个配置文件,告诉 Systemd 怎么启动这个 Unit 。
Systemd 默认从目录/etc/systemd/system/读取配置文件。但是,里面存放的大部分文件都是符号链接,指向目录/usr/lib/systemd/system/,真正的配置文件存放在那个目录。systemctl enable命令用于在上面两个目录之间,建立符号链接关系。
配置文件的后缀名,就是该 Unit 的种类,比如sshd.socket。如果省略,Systemd 默认后缀名为.service,所以sshd会被理解成sshd.service
systemctl list-unit-files命令用于列出所有配置文件:
1
2
3
4
5
6
7
8
9
10
11
12
13
14
15
16
17
18
19
20
21
22
|
$ systemctl list-unit-files
UNIT FILE STATE
proc-sys-fs-binfmt_misc.automount static
-.mount generated
dev-hugepages.mount static
dev-mqueue.mount static
media-floppy0.mount generated
proc-sys-fs-binfmt_misc.mount static
run-vmblock\x2dfuse.mount enabled
snap-bare-5.mount enabled
$ systemctl list-unit-files --type=service
UNIT FILE STATE
accounts-daemon.service enabled
acpid.service disabled
alsa-restore.service static
alsa-state.service static
alsa-utils.service masked
anacron.service enabled
apparmor.service enabled
|
- enabled:已建立启动链接
- disabled:没建立启动链接
- static:该配置文件没有
[Install]部分(无法执行),只能作为其他配置文件的依赖
- masked:该配置文件被禁止建立启动链接
一旦修改配置文件,就要让 Systemd 重新加载配置文件,然后重新启动,否则修改不会生效:
1
2
| $ sudo systemctl daemon-reload
$ sudo systemctl restart xxx.service
|
配置文件格式
systemctl cat命令可以查看配置文件的内容,配置文件分成几个区块,每个区块的第一行,是用方括号表示的区别名,比如[Unit]。注意,配置文件的区块名和字段名,都是大小写敏感的。区块内部是一些等号连接的键值对。
配置文件字段信息详见:systemd.unit
Target
启动计算机的时候,需要启动大量的 Unit。如果每一次启动,都要一一写明本次启动需要哪些 Unit,显然非常不方便。Systemd 的解决方案就是 Target。
简单说,Target 就是一个 Unit 组,包含许多相关的 Unit 。启动某个 Target 的时候,Systemd 就会启动里面所有的 Unit。从这个意义上说,Target 这个概念类似于”状态点”,启动某个 Target 就好比启动到某种状态。
传统的init启动模式里面,有 RunLevel 的概念,跟 Target 的作用很类似。不同的是,RunLevel 是互斥的,不可能多个 RunLevel 同时启动,但是多个 Target 可以同时启动。
1
2
3
4
5
6
7
8
9
10
11
12
13
14
15
16
|
$ systemctl list-unit-files --type=target
$ systemctl list-dependencies multi-user.target
$ systemctl get-default
$ sudo systemctl set-default multi-user.target
$ sudo systemctl isolate multi-user.target
|
Target与RunLevel的对应关系:
1
2
3
4
5
6
7
8
9
10
|
Traditional runlevel      New target name     Symbolically linked to

Runlevel 0           |    runlevel0.target -> poweroff.target
Runlevel 1           |    runlevel1.target -> rescue.target
Runlevel 2           |    runlevel2.target -> multi-user.target
Runlevel 3           |    runlevel3.target -> multi-user.target
Runlevel 4           |    runlevel4.target -> multi-user.target
Runlevel 5           |    runlevel5.target -> graphical.target
Runlevel 6           |    runlevel6.target -> reboot.target
|
systemd与init主要的差别:
(1)默认的 RunLevel(在/etc/inittab文件设置)现在被默认的 Target 取代,位置是/etc/systemd/system/default.target,通常符号链接到graphical.target(图形界面)或者multi-user.target(多用户命令行)。
(2)启动脚本的位置,以前是/etc/init.d目录,符号链接到不同的 RunLevel 目录 (比如/etc/rc3.d、/etc/rc5.d等),现在则存放在/lib/systemd/system和/etc/systemd/system目录。
(3)配置文件的位置,以前init进程的配置文件是/etc/inittab,各种服务的配置文件存放在/etc/sysconfig目录。现在的配置文件主要存放在/lib/systemd目录,在/etc/systemd目录里面的修改可以覆盖原始设置。
journalctl
Systemd 统一管理所有 Unit 的启动日志。带来的好处就是,可以只用journalctl一个命令,查看所有日志(内核日志和应用日志)。日志的配置文件是/etc/systemd/journald.conf
常用的查看日志命令:
1
2
3
4
5
6
7
8
9
10
11
12
13
14
15
16
17
18
19
20
21
22
23
24
25
26
27
28
29
30
31
32
33
34
35
36
37
38
39
40
41
42
43
44
45
46
47
48
49
50
51
52
53
54
55
56
57
58
59
60
61
62
63
64
65
66
67
68
69
70
71
72
73
74
75
76
77
78
79
80
|
$ sudo journalctl
$ sudo journalctl -k
$ sudo journalctl -b
$ sudo journalctl -b -0
$ sudo journalctl -b -1
$ sudo journalctl --since="2012-10-30 18:17:16"
$ sudo journalctl --since "20 min ago"
$ sudo journalctl --since yesterday
$ sudo journalctl --since "2015-01-10" --until "2015-01-11 03:00"
$ sudo journalctl --since 09:00 --until "1 hour ago"
$ sudo journalctl -n
$ sudo journalctl -n 20
$ sudo journalctl -f
$ sudo journalctl /usr/lib/systemd/systemd
$ sudo journalctl _PID=1
$ sudo journalctl /usr/bin/bash
$ sudo journalctl _UID=33 --since today
$ sudo journalctl -u nginx.service
$ sudo journalctl -u nginx.service --since today
$ sudo journalctl -u nginx.service -f
$ journalctl -u nginx.service -u php-fpm.service --since today
$ sudo journalctl -p err -b
$ sudo journalctl --no-pager
$ sudo journalctl -b -u nginx.service -o json
$ sudo journalctl -b -u nginx.serviceqq
-o json-pretty
$ sudo journalctl --disk-usage
$ sudo journalctl --vacuum-size=1G
$ sudo journalctl --vacuum-time=1years
|