什么是Nginx反向代理

互联网冲浪的时候,感觉自己的一切言行都被打上了指纹,于是乎打算自己搞一个即时通讯工具玩的时候发现一个开源的即时通讯系统openIM,搭建后端的时候发现可以用Nginx反向代理将流量转发到内网的不同主机上以实现负载均衡,瞬时感觉很神奇,接触到了之前不知道的东西,因此学习记录一下以备日后翻阅。

Nginx安装

环境

阿里云免费领的ECS

操作系统:Ubuntu 18.04

APT简易安装

查看版本信息

1
2
apt-get update
apt show nginx

结果:

1
2
3
4
5
6
7
8
9
10
11
12
13
14
15
16
17
18
19
20
21
22
23
Package: nginx
Version: 1.14.0-0ubuntu1.10
Priority: optional
Section: web
Origin: Ubuntu
Maintainer: Ubuntu Developers <ubuntu-devel-discuss@lists.ubuntu.com>
Original-Maintainer: Debian Nginx Maintainers <pkg-nginx-maintainers@lists.alioth.debian.org>
Bugs: https://bugs.launchpad.net/ubuntu/+filebug
Installed-Size: 44.0 kB
Depends: nginx-core (<< 1.14.0-0ubuntu1.10.1~) | nginx-full (<< 1.14.0-0ubuntu1.10.1~) | nginx-light (<< 1.14.0-0ubuntu1.10.1~) | nginx-extras (<< 1.14.0-0ubuntu1.10.1~), nginx-core (>= 1.14.0-0ubuntu1.10) | nginx-full (>= 1.14.0-0ubuntu1.10) | nginx-light (>= 1.14.0-0ubuntu1.10) | nginx-extras (>= 1.14.0-0ubuntu1.10)
Homepage: http://nginx.net
Supported: 5y
Download-Size: 3,596 B
APT-Sources: http://mirrors.cloud.aliyuncs.com/ubuntu bionic-updates/main amd64 Packages
Description: small, powerful, scalable web/proxy server
Nginx ("engine X") is a high-performance web and reverse proxy server
created by Igor Sysoev. It can be used both as a standalone web server
and as a proxy to reduce the load on back-end HTTP or mail servers.
.
This is a dependency package to install either nginx-full (by default),
nginx-light or nginx-extras.

N: There is 1 additional record. Please use the '-a' switch to see it

这里选择默认的nginx-full就可以,所以直接用sudo apt-get install nginx就是默认安装nginx-full

安装目录说明

1
2
3
4
/usr/sbin/nginx:主程序,启动文件
/etc/nginx:存放配置文件
/var/www/html:存放项目目录
/var/log/nginx:存放日志

以上是通过apt默认安装的目录信息,可能随着版本不同有所变化

nginx一些管理命令

1
2
3
service nginx start
service nginx restart
service nginx stop

Nginx反向代理

什么是反向代理

用过“科学上网”的都知道,代理服务器是个什么东西,简单的用下面这张图来解释吧:

防火墙会拦截我们的谷歌的请求,但是不会拦截我们访问代理服务器的请求,那么我们就可以通过代理服务器访问谷歌。

那么什么是反向代理呢?

如下图所示,我们只需要将请求发送到反向代理服务器,由反向代理服务器去选择目标服务器获取数据后,再返回给客户端,此时反向代理服务器和目标服务器对外就是一个服务器,暴露的是代理服务器地址,隐藏了真实服务器 IP地址。

Nginx配置文件

如果是使用apt默认安装的话,配置文件nginx.conf应该在/etc/nginx/目录下。

1
2
3
4
5
6
7
8
9
10
11
12
13
14
15
16
17
18
19
20
21
22
23
24
25
26
27
28
29
30
31
32
33
34
35
36
37
38
39
40
41
42
43
44
45
46
47
48
49
50
51
52
53
54
55
56
57
58
59
60
61
62
63
64
65
66
67
68
69
70
71
72
73
74
75
76
77
78
79
80
81
82
83
84
85
user www-data;
worker_processes auto;
pid /run/nginx.pid;
include /etc/nginx/modules-enabled/*.conf;

events {
worker_connections 768;
# multi_accept on;
}

http {

##
# Basic Settings
##

sendfile on;
tcp_nopush on;
tcp_nodelay on;
keepalive_timeout 65;
types_hash_max_size 2048;
# server_tokens off;

# server_names_hash_bucket_size 64;
# server_name_in_redirect off;

include /etc/nginx/mime.types;
default_type application/octet-stream;

##
# SSL Settings
##

ssl_protocols TLSv1 TLSv1.1 TLSv1.2; # Dropping SSLv3, ref: POODLE
ssl_prefer_server_ciphers on;

##
# Logging Settings
##

access_log /var/log/nginx/access.log;
error_log /var/log/nginx/error.log;

##
# Gzip Settings
##

gzip on;

# gzip_vary on;
# gzip_proxied any;
# gzip_comp_level 6;
# gzip_buffers 16 8k;
# gzip_http_version 1.1;
# gzip_types text/plain text/css application/json application/javascript text/xml application/xml application/xml+rss text/javascript;

##
# Virtual Host Configs
##

include /etc/nginx/conf.d/*.conf;
include /etc/nginx/sites-enabled/*;
}


#mail {
# # See sample authentication script at:
# # http://wiki.nginx.org/ImapAuthenticateWithApachePhpScript
#
# # auth_http localhost/auth.php;
# # pop3_capabilities "TOP" "USER";
# # imap_capabilities "IMAP4rev1" "UIDPLUS";
#
# server {
# listen localhost:110;
# protocol pop3;
# proxy on;
# }
#
# server {
# listen localhost:143;
# protocol imap;
# proxy on;
# }
#}

上面是一份默认的配置文件,去除注释部分之后,整个配置文件大概可以分为三个部分。

全局部分

也就是最开始的部分,一直到events之前的部分,主要会设置一些影响Nginx服务器整体运行的配置指令,主要包括:配置运行Nginx服务器的用户(组)、允许生成的 worker_process 数,进程PID存放路径以及配置文件的引入等。worker_process 数是处理并发的关键配置,表示开启几个业务进程,值越大可以支持的并发处理数量越多,但是会受到设备限制。

1
2
3
4
user www-data;
worker_processes auto;
pid /run/nginx.pid;
include /etc/nginx/modules-enabled/*.conf;

events部分

配置影响nginx服务器或与用户的网络连接。有每个进程的最大连接数,选取哪种事件驱动模型处理连接请求,是否允许同时接受多个网路连接,开启多个网络连接序列化等。

http部分

可以嵌套多个server,配置代理,缓存,日志定义等绝大多数功能和第三方模块的配置。如文件引入,mime-type定义,日志自定义,是否使用sendfile传输文件,连接超时时间,单连接请求数等。

server块:配置虚拟主机的相关参数,一个http中可以有多个server。

location块:配置请求的路由,以及各种页面的处理情况,一个server块可以包含多个location。

下面配置指令参考Nginx 配置详解 | 菜鸟教程 (runoob.com)

1
2
3
4
5
6
7
8
9
10
11
12
13
14
15
16
17
18
19
20
21
22
23
24
25
26
27
28
29
30
31
32
33
34
35
36
37
38
39
########### 每个指令必须有分号结束。#################
#user administrator administrators; #配置用户或者组,默认为nobody nobody。
#worker_processes 2; #允许生成的进程数,默认为1
#pid /nginx/pid/nginx.pid; #指定nginx进程运行文件存放地址
error_log log/error.log debug; #制定日志路径,级别。这个设置可以放入全局块,http块,server块,级别以此为:debug|info|notice|warn|error|crit|alert|emerg
events {
accept_mutex on; #设置网路连接序列化,防止惊群现象发生,默认为on
multi_accept on; #设置一个进程是否同时接受多个网络连接,默认为off
#use epoll; #事件驱动模型,select|poll|kqueue|epoll|resig|/dev/poll|eventport
worker_connections 1024; #最大连接数,默认为512
}
http {
include mime.types; #文件扩展名与文件类型映射表
default_type application/octet-stream; #默认文件类型,默认为text/plain
#access_log off; #取消服务日志
log_format myFormat '$remote_addr$remote_user [$time_local] $request $status $body_bytes_sent $http_referer $http_user_agent $http_x_forwarded_for'; #自定义格式
access_log log/access.log myFormat; #combined为日志格式的默认值
sendfile on; #允许sendfile方式传输文件,默认为off,可以在http块,server块,location块。
sendfile_max_chunk 100k; #每个进程每次调用传输数量不能大于设定的值,默认为0,即不设上限。
keepalive_timeout 65; #连接超时时间,默认为75s,可以在http,server,location块。

upstream mysvr {
server 127.0.0.1:7878;
server 192.168.10.121:3333 backup; #热备
}
error_page 404 https://www.baidu.com; #错误页
server {
keepalive_requests 120; #单连接请求上限次数。
listen 4545; #监听端口
server_name 127.0.0.1; #监听地址
location ~*^.+$ { #请求的url过滤,正则匹配,~为区分大小写,~*为不区分大小写。
#root path; #根目录
#index vv.txt; #设置默认页
proxy_pass http://mysvr; #请求转向mysvr 定义的服务器列表
deny 127.0.0.1; #拒绝的ip
allow 172.18.5.54; #允许的ip
}
}
}

Nginx配置反向代理

实现效果:使用Nginx反向代理,根据访问的路径跳转到不同端口服务中,Nginx监听端口为80

修改Nginx配置文件:

1
2
3
4
5
6
7
8
9
10
11
12
server {
listen 80;
server_name 47.x.x.x;

location ~ /test1/ {
proxy_pass http://192.168.1.1:8080
}

location ~ /test2/ {
proxy_pass http://192.168.1.2:8080
}
}

根据上面的配置,当请求到达 Nginx 反向代理服务器时,会根据请求路径不同进行分发到不同的服务上。

location匹配说明

1
2
3
location [ = | ~ | ~* | ^~] uri {

}
1
2
3
4
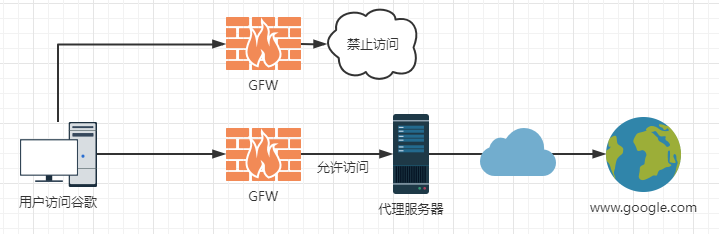
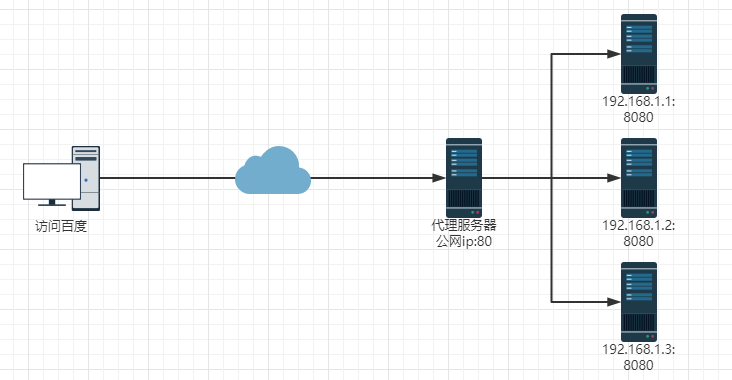
= :用于不含正则表达式的 uri 前,要求请求字符串与 uri 严格匹配,如果匹配成功,就停止继续向下搜索并立即处理该请求
~:用于表示 uri 包含正则表达式,并且区分大小写
~*:用于表示 uri 包含正则表达式,并且不区分大小写
^~:用于不含正则表达式的 uri 前,要求 Nginx 服务器找到标识 uri 和请求。字符串匹配度最高的 location 后,立即使用此 location 处理请求,而不再使用 location块中的正则 uri 和请求字符串做匹配。

什么是Nginx反向代理
https://chujian521.github.io/blog/2022/10/15/什么是Nginx反向代理/
作者
Encounter
发布于
2022年10月15日
许可协议